Saturday, June 30, 2012

Inspired by a kaiser roll? Really?

Beautiful 14' Walnut Kaiser Bowl 
Oh, that's why it's called a Kaiser bowl

Hello faithful followers!
About a month from now I will be introducing my Kaiser bowl designs at the Turn on Chicago event instant gallery. Anyone going I would love to meet with you! Drop me a line at my website www.theurbanturner.com

Tuesday, June 26, 2012

Sculpted Vessel in Progress

Vessel started my getting depth into the guidelines

 Then shaping to the design at the top of the piece....


...and again the design the bottom. Hope you like the progress. It's experimental, but I like the John Jordan look so far. Maple 8x8.

Saturday, June 23, 2012

Good morning! Well the logs from yesterday have been cut into mulberry blanks. Stuff has a kind of light sap like a pine. Nice grain, and some nice color inflection at this point. I even have some cool spalting as in the square piece in the front. When I don't know what to do with a piece right away I just leave kind of a rectangle like that.

Friday, June 22, 2012

Just brought home a load of Mulberry. First time with this strange colored wood. I wish it kept this yellowish color but I hear it fades quickly. It has a reputation for turning well so....I will give you my 2 cents on it in a few days.

Wednesday, June 20, 2012

Remember that Burr Oak Tree I cut down on youtube a few weeks ago? Here is two pieces from that two hundred year old tree. Grain is excellent. Good examples of the brushing lacquer/wax technique I spoke of earlier.

Tuesday, June 19, 2012

Are you going for the ultimate tactile/shine experience?

If you haven't tried it, do this; sand the wood 80,120,180. Then go straight to a bath of mineral oil and let stand over night. Next day, sand 220 and 320 lightly just to knock off the raised grain. Then brush on Cabot Super Clear brushing lacquer liberally and hang to dry. Make sure you use confident strokes with a quality brush, and a raking light to make sure it is evenly covered. Dry overnight. Day 3, 0000 steel wool, then use the three step waxing system. Your piece will feel and look like an absolute piece of jewelry. 

Sunday, June 17, 2012

Early Burl Coffee Table Piece

Last year working a willow burl. I found Willow to be easy to cut when its wet but feathers when it's dry. It never really worked out but it was one of my first pieces on a really nice, unique looking piece of wood like this. So, it sat in the shop for a whole year....come to think of it...it's still there. Anyone have one they just hang onto...

Saturday, June 16, 2012

A weekend with Trent Bosch

Here's a cool shot. Myself and 3 other students created this mess at Trent Bosch's studio during a three day workshop last summer. If you haven't done so, look up Trent in Colorado. His seminars and personal trainings are highly respected for good reason. See www.trentbosch.com.

Home is where the wood is...

Always fascinates me how a piece of wood can be a beautiful heirloom that could define yourself as a craftsman, or just a good burning piece of firewood on a cool night in Wisconsin. You just don't know until it's done spinning!

Friday, June 15, 2012

"Maple Girls"

My Ladies.
Top to bottom:
Mackenzie (10)
Sadie (2)

Kenzie is a great help around the shop. She sweeps and cleans. Sadie just likes to play with the compressed air (:

Thursday, June 14, 2012

Walnut Table

Are you crazy! No this is not mine, this is a 18th century English piece made of native walnut. The sculpted top is nearly six feet wide. The sculpting and patina on the piece is exquisite. Notice the notched edge is carved into the piece which means core of the top was essentially hollowed and leveled with tremendous skill given the curl of the grain. Photo courtesy of The Milwaukee Museum of Art.

Wednesday, June 13, 2012

Introducing the twisted tail

 Hollowed this one out last night. Because it is so far away from the power I needed to support it with the wheel ring. Planned for a twisted tail on this one.
 After band sawing the general shape of the tail, I began to shape it making some design decisions as I go.
Here the tail has been roughed out and sanded to 220 using the mandrel on the lathe. Actually, the lathe was used exclusively to rough shape and sand the tail. Some handwork needed of course. Overall, I think it has a lot of potential....we will see how far I can take it on the next one.

Monday, June 11, 2012

Large Hollow Form

Pretty rough, roughed out vessel. Burr Oak seams to darken on the edges like this. Anyone know why? I hope it sands out! Otherwise, that's about 4 hours of hard hollowing chalked up for experience only.....

Sunday, June 10, 2012

Fiddleback Maple Vessel

Here's one I feel pretty good about. The fiddleback is the best I have seen. I have a ton of this roughed out and can't wait to see the bowls. Trent Bosch inspired from his training last summer....

Friday, June 8, 2012

In need of an extreme bend tool

It seems that a 16" hollow form needs an extreme bend to take it to finished thickness just before the turn. Time to call Trent Bosch for more tools. Never a problem buying more tools right? By the way, hollowing tools or gouges I recommend two tools makers: Thompson tools and Trent Bosch. You can't go wrong with either.

Thursday, June 7, 2012

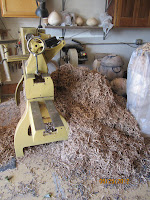
Watch the shavings fly!

Looks like the bowl and vessel roughing season is in full swing here in Wisconsin!
That sweet smell of wet shavings-ummmmm. 
Roughed out about a dozen bowls, my arms feel like jelly.
Not quite to the top of the lathe, but close....
Bowls roughed now are preservative treated and should be ready to final turn in a few months.

Website Photo Question

It seems I have gotten a lot of responses on my new photo on the website. Most wanting to know how the colors were created. I simply use a canon camera that has a feature called color swap. Essentially, you are able to choose a color and it will be "washed" into the other colors in the subjects of the image. I usually choose the dominant color- in this case grey. Hope that helps! Keep the questions and comments coming!